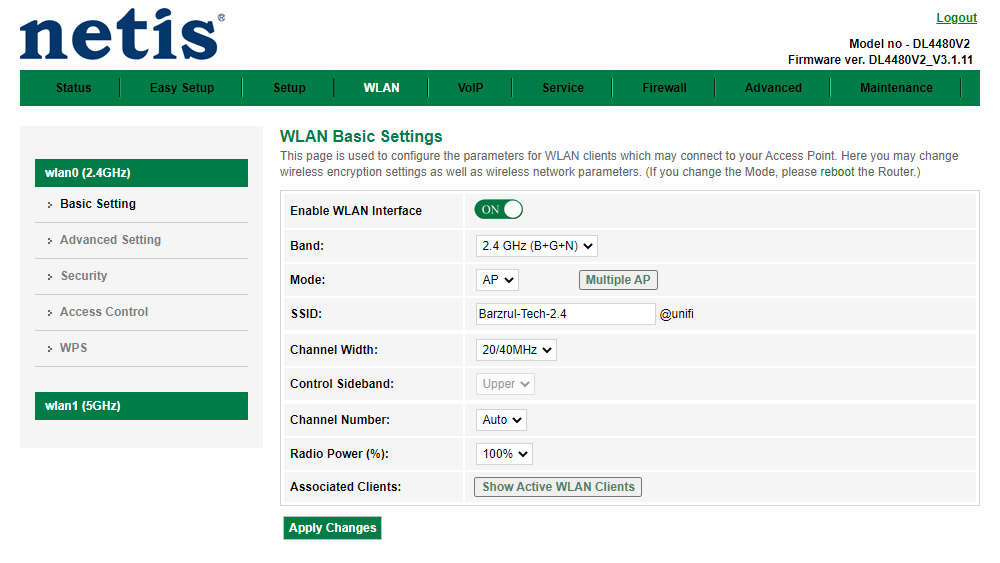
As you may notice, I terminated my Unifi account last year due to no coverage in my new residential area. However, by end of last year, I did subscribe to Unifi 30Mbps when their coverage became available in my area. This time they give me a different modem router. So, in this post, I will show you how to change Unifi Wifi password on Netis router.
Basically, TM will change their default Unifi Fibre modem router once every two or three years. So, different routers may have different configuration pages. If you are using the old router which is TP-Link Archer C1200, I’ve covered the full tutorial on how to change Unifi Wifi password on TP-Link Archer C1200 router.
Note: I’m using TM default modem router for this tutorial which is Netis router model no DL4480V2.
See also how to change Unifi DNS Server on TP-Link router.
How to change Unifi Wifi password on Netis router
Make sure your computer is connected to the Wifi network, then continue with the following steps.
Note: If you don’t want to change your Wifi network name, you can skip steps 5, 6, 7, 11, 12, and 13.
- Open any internet browser.
- Go to http://192.168.1.1/.
- Enter your login information:
- Username: tmadmin
- Password: Adm@XXXX (XXXX is the last 4 digit of MAC address)
- From the menu, click WLAN.
- On the left menu, under wlan0 (2.4GHz) section, click Basic Settings.
- Enter the new Wifi network name in the box next to SSID.
- Click Apply Changes.
- On the left menu, click Security.
- Under WLAN Security Settings page:
- For Encryption type, select WPA2 Mixed.
- For Authentication Mode, select Personal (Pre-Shared Key).
- For Pre-Shared Key Format, select Passphrase.
- For Pre-Shared Key, enter the new Wifi password.
- Click Apply Changes.
- Now, do for band 5GHz. On the left menu, click wlan1 (5GHz) and click Basic Settings.
- Enter the new Wifi network name in the box next to SSID.
- Click Apply Changes.
- On the left menu, click Security.
- Under WLAN Security Settings page:
- For Encryption type, select WPA2 Mixed.
- For Authentication Mode, select Personal (Pre-Shared Key).
- For Pre-Shared Key Format, select Passphrase.
- For Pre-Shared Key, enter the new Wifi password.
- Click Apply Changes.
- Done.
Your computer or device will be automatically disconnected from the Wifi network. All you need to do is to re-connect back to the new Wifi network name using the new Wifi password.
If you need any help, let me know in the comment below.
Leave a Reply