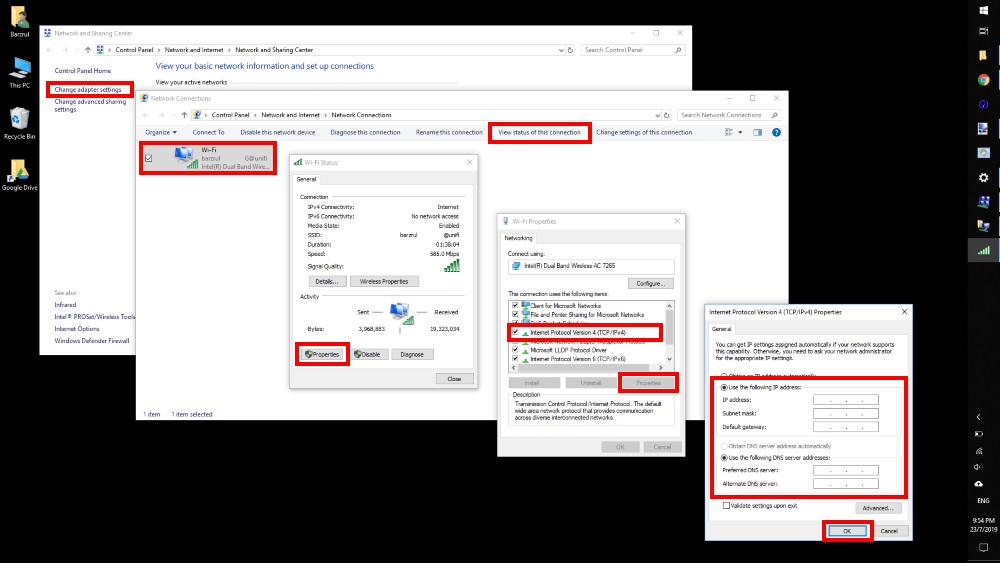
Learn how to set up a Static IP Address in Windows 10. If you’re planning on forwarding ports, your computer will need a Static IP Address to work every time you reboot the computer.
Basically, IP Address is a four sets of numbers that are separated by periods that allow computers to identify each other. Every computer on any network has at least one IP Address.
Important! Two computers on the same network should never have the same IP Address.
See also how to block IP address using Windows Defender Firewall in Windows 10.
How to set up a Static IP Address in Windows 10
First, you need to copy the necessary information from your computer. All the information will be viewed in Command Prompt.
- Open Command Prompt by pressing Windows key, type cmd and press Enter.
- Type
ipconfig /alland press Enter. - From the information listed, write down the following on a separate note:
- IPv4 Address
- Subnet Mask
- Default Gateway
- DNS Servers
- Type
Exitand press Enter to close Command Prompt window.
Keep this information, you’ll need them in the following steps.
Here is the step by step to set up a Static IP address in Windows 10. You’ll start by opening the Control Panel window.
- Click Start.
- Select Settings.
- Select Network & Internet.
- Select Status.
- Select Network and Sharing Center.
- Select Change adapter settings.
- Select the active network.
- Select View status of this connection.
- Select Properties.
- Select Internet Protocol Version 4 (TCP/IPv4).
- Select Properties.
- Click to check Use the following IP address.
- Enter the new IP address. It should be similar to your router’s IP address but the end number must be different.
- Example: If your router IP address is 192.168.1.1, you can enter 192.168.1.2. The new IP address should end between the number 1 to 254 and must be different from the router’s IP address and other devices.
- Important! every device must have a different IP address. Otherwise, neither device will be able to connect to the internet because of IP address conflict.
- Continue to enter the Subnet Mask and the Default Gateway (you copied from Command Prompt).
- It will automatically check the Use the following DNS server addresses.
- Continue to enter the DNS servers (you copied from Command Prompt).
- Click OK to save the changes.
Done, your Windows 10 computer should use a Static IP Address and can be configured for port forwarding.
Once you complete the setup, your computer is ready for port forwarding — if you plan to, or any activity required static IP address.
If you encounter any issue, let me know in the comment below.
Leave a Reply