Tired of using TM default DNS server? Looking to speed up your Unifi Fibre internet speed? If the answer is Yes to any or both of these questions, you’re at the right place. Here’s I’ll show you how to change Unifi DNS Server.
By changing the DNS server, you’re looking at a few benefits. They can be faster, more stable, and safer compare to the default DNS server provided by TM. I’ve provided some of the most popular DNS Servers in the tutorial below. You can choose to use DNS provided by Google, CloudFlare, or OpenDNS.
If you looking for a more family-type DNS, use OpenDNS FamilyShield DNS Server below. This DNS Server is for users who want to keep their children from seeing inappropriate images on their computers. This DNS is free to use and you don’t need a registered network to use FamilyShield.
Note: I’m using the default router provided by TM which is TP-Link Archer C1200 wireless router.
See also how to check your Unifi Fibre Wifi network for unwelcomed device and block them.
How to change Unifi DNS Server on TP-Link router
- Open any internet browser.
- Go to http://192.168.0.1.
- Enter your login detail:
- Username/ID: admin
- Password: admin
- Click Login.
- Select Advanced tab.
- Select Network menu.
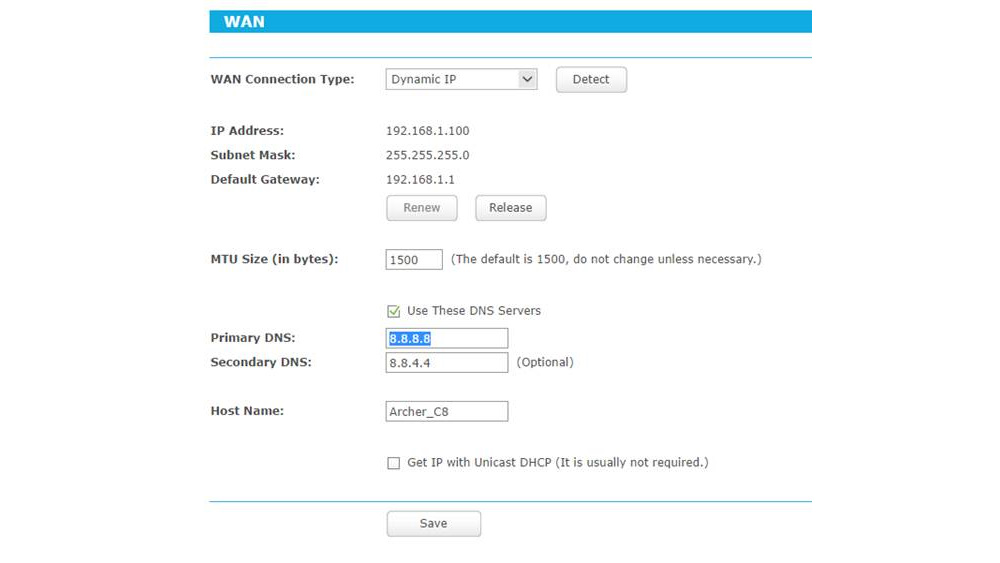
- Select WAN sub-menu.
- Check the Use These DNS Servers box.
- In the Primary DNS, enter any of the following DNS servers:
- Google DNS: 8.8.8.8
- CloudFlare DNS: 1.1.1.1
- OpenDNS: 208.67.222.123
- OpenDNS FamilyShield: 208.67.222.123
- In the Secondary DNS, enter any of the following servers:
- Google DNS: 8.8.4.4
- CloudFlare DNS: 1.0.0.1
- OpenDNS: 208.67.222.220
- OpenDNS FamilyShield: 208.67.220.123
- Click Save to keep the changes.
- Disconnect and re-connect your device to the Wifi network.
Now, your internet connection should be using the new DNS sever you just configured in the above steps.
Hopefully, this tutorial will help you to successfully change the default TM DNS server to a better DNS. If you’re looking for another DNS server, here’s how to find the fastest and nearest server around you.
Don’t forget to leave some comments below when you’re done with the settings.
Leave a Reply